Skip to Content

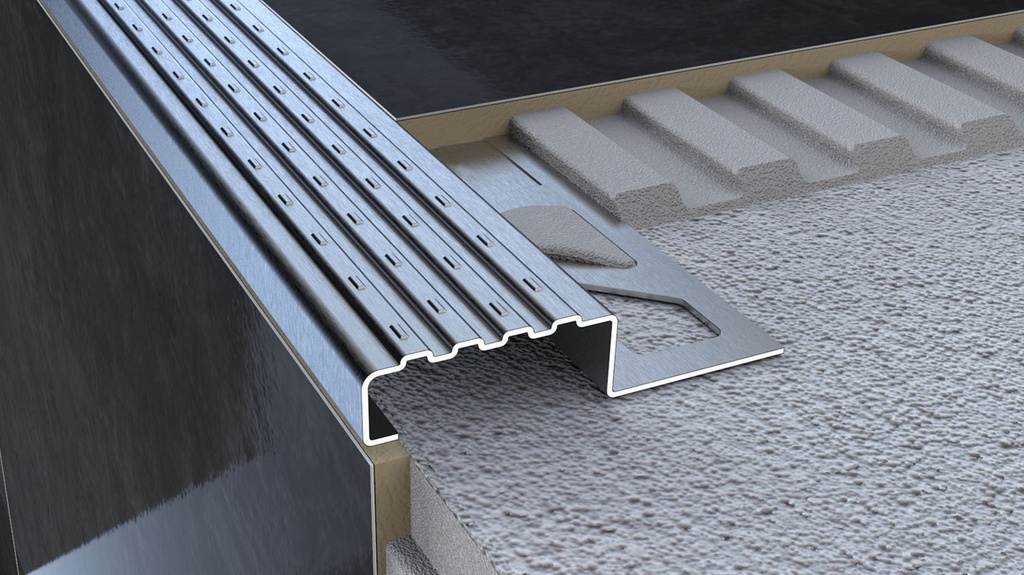
PM60 - Internal Stairs Edge Protection Profile

https://www.gruen-systems.com/web/image/product.template/53/image_1920?unique=d4e9fed
  • Profile Dimension
  • Material
  • Profile Color
  • Length

This combination does not exist.

Material: Stainless Steel
Profile Color: Brushed Stainless
Length: 8' 2-1/2" (250cm)
Unbonded Installation Instructions

For the following instructions it is assumed that the pre sloped shower pan and a 2 piece drain flange have been installed and tested according to local building codes.


1. Screw the 2” threaded outlet adaptor into the existing drain flange.

2. Determine finish height of the drain taking into account for the finished mud bed/dry pack and thickness of tile being installed.

3. Place pea gravel over drain flange coupling weep holes and around perimeter to prevent mortar from filling and blocking holes.

4. Push the stainless steel drain outlet tube into the 2” threaded adapter.

5. Mix mortar bed material according to manufacturer's recommendations.Pack mortar under the drain to support and make sure it’s completely level in both directions.

6. Apply the rest of the mortar over the shower pan, packing and screeding to insure a ¼” per foot slope towards drain per code. NOTE: Make sure to leave the mortar bed down the thickness of the tile and tile mortar from the top of the linear drain.

7. Allow mortar to cure.

8. Install tile with manufacturer's recommended mortar. The tile should be flush with the top of the drain body.

9. Once tiling and grouting are complete, apply a thin bead of silicone around the drain and tile.

Bonded Waterproofing Installation Instructions

1. Using an inside pipe cutter, cut the existing 2” waste pipe ½” below the finished subfloor. (this will leave 1 ½” to the top of the bonding flange)

2. Install a cleavage membrane(tar paper or plastic)

3. Install Galvanized metal lath and staple down.

4. Mix up Drypack mortar.

5. Install Grueconnect to the the bottom of the Integrated sealing membrane flange and lubricate the bottom of the Grueconncect with liquid soap.

6. Place mortar on both sides of the drain hole. Place the Integrated sealing membrane flange with the Grueconnect into the floor drain flange. Push down to make a good connection and allow for a minimum of 1” space between the floor and the bottom of the Integrated sealing membrane flange. Pack mortar under flange and make sure it’s level in both directions.

7. Install the remainder of the shower pan mortar, packing and screeding allowing a ¼” per foot slope towards the drain according to code.

8. Allow mortar to cure.

9. Vacuum surface well making sure of no loose debris.

10. Mix approved tile mortar to a fairly fluid consistency.

11. Using a ¼” x 3/16” V notch trowel, first flat trowel a layer of mortar around the perimeter of the Integrated sealing membrane flange.Then immediately apply additional mortar with the notch side.

12. Unfold the membrane from the flange and place in the troweled mortar. Embed the membrane using the flat side of the trowel or drywall finishing knife. Ensure full coverage and remove all air pockets.

13. Install additional mortar on the shower floor. First flat rowel mortar then comb additional mortar with the notch side. Make sure to extend mortar at least 2” over the flange membrane on all sides.

14. Measure sheet membrane allowing 2” overlap onto flange membrane and cut sheet membrane to size. Place sheet membrane into wet mortar and embed membrane using the flat side of a trowel or a drywall finishing knife. Make sure the membrane is well bonded and remove all air pockets.

15. Place a sheet of cardboard over the membrane to protect and continue installing inside and outside corners.

16. Place some mortar in the drain flange on both sides of the drain hole. Install the drain into the flange making sure it’s seated well and level in both directions.

17. Install floor tile and grout once cured.

18. Install a bead of silicone between drain flange and tile.

General Cleaning and Maintenance Guidelines

• Cleaning Frequency: Clean the drain and cover at intervals ranging from once a week to once a month, depending on usage intensity and local water hardness/contamination conditions. Shorten this interval in high-traffic applications.

• Cleaning Agents: For stainless steel surfaces, use pH-neutral or mild household cleaners. Avoid products containing strong acids (such as chlorine, hydrochloric acid, hydrofluoric acid) or highly alkaline substances.

• Cleaning Tools: Use soft microfiber cloths or sponges. Hard brushes, steel wool, or wire brushes will scratch the surface. Do not spray or pour cleaning agents directly onto the product; apply them to the cloth first and then clean the surface.

• Brushed / Textured Surfaces: Always clean brushed finishes in the direction of the grain to maintain the original surface appearance.

• Rinsing and Drying: After cleaning, thoroughly rinse all detergent residues with clean water. Dry the surface with a soft cloth to prevent water spots and staining.

• Siphon and Odour Trap Maintenance: Periodically remove the cover and siphon components to clear accumulated hair, soap residue, and other deposits. Regular cleaning helps prevent blockages and unpleasant smells.

• Protection and Corrosion Prevention: Avoid direct contact with other metallic surfaces. Do not leave mortar or cement residues on the product, as these can cause long-term surface damage.

• Surface Finish Compatibility: Select cleaning agents and tools suitable for the specific surface finish (polished, matte, or brushed). For example, polished finishes are more sensitive to scratches.


Brushed Stainless


FU61 - End Cap